
 Save
Save
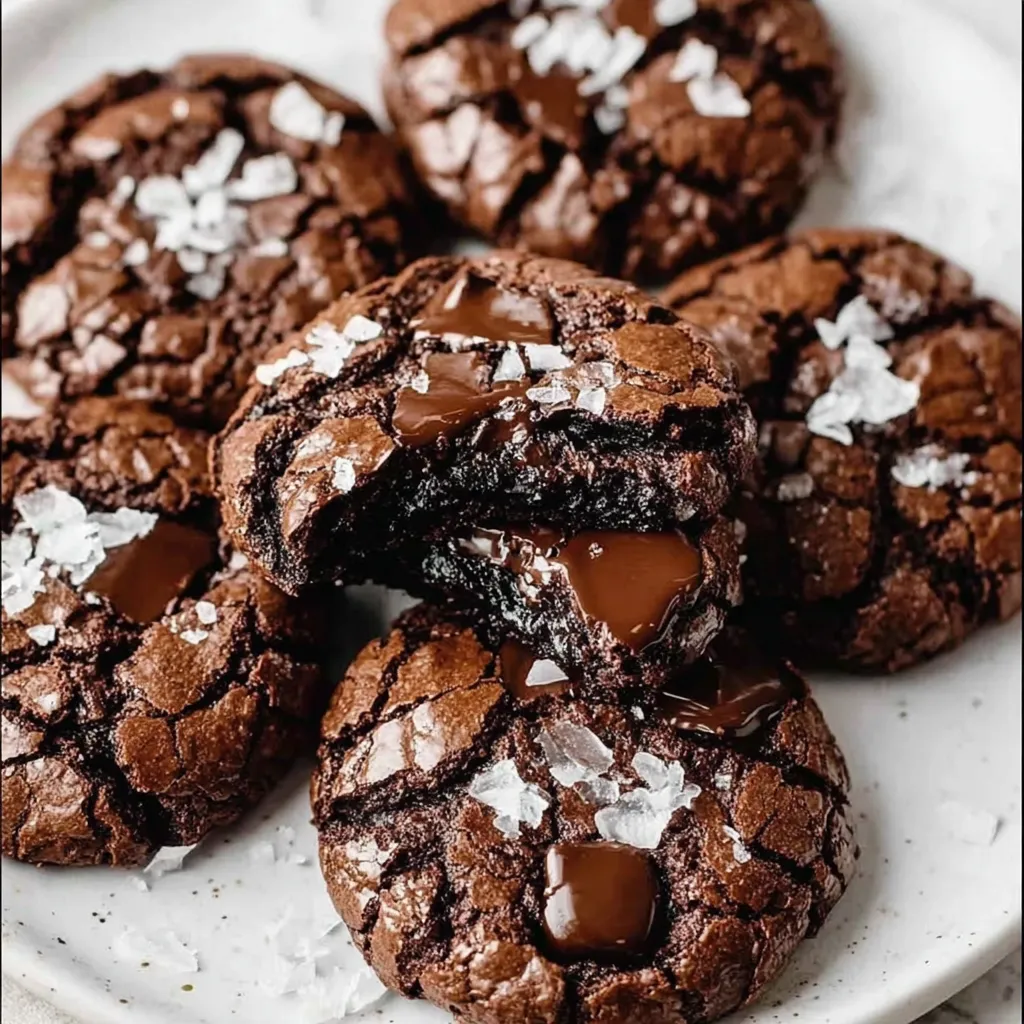
These chocolate lava cookies deliver the perfect balance between a fudgy cookie exterior and a molten chocolate center that flows like lava with each bite. I developed this recipe after my family begged for something that combined their love of chocolate lava cake with the convenience of cookies.
I first made these during a holiday baking marathon, and they've become the most requested dessert at every family gathering. My nephew actually pretended to be sick so he could stay home from school when he heard I was baking these!
Ingredients
- All purpose flour: creates the perfect structure while keeping the cookies tender
- Unsweetened cocoa powder: provides deep chocolate flavor without extra sweetness
- Baking powder: gives just enough lift without making them cakey
- Salt: enhances all the flavors and balances the sweetness
- Semi sweet chocolate: for melting into the batter creates the rich base flavor
- Chocolate chunks: for the centers melt into molten pools of goodness
- Unsalted butter: adds richness and helps create those crackly tops
- Granulated sugar: provides sweetness and helps create the crackly exterior
- Brown sugar: adds moisture and a subtle caramel note
- Large eggs: bind everything together and add structure
- Vanilla extract: rounds out the chocolate flavor with warmth
Step-by-Step Instructions
- Prepare the Dry Ingredients:
- Whisk together the flour, cocoa powder, baking powder, and salt in a medium bowl. This step ensures even distribution of the leavening agent and prevents any cocoa powder lumps in your final cookies.
- Create the Chocolate Base:
- Combine the 6 ounces of chopped chocolate with butter in a microwave safe bowl. Heat in 30 second intervals, stirring thoroughly between each until completely melted. Allow this mixture to cool slightly so it does not cook the eggs when combined. The chocolate should be smooth and glossy.
- Mix the Wet Ingredients:
- Whisk together both sugars, eggs, and vanilla extract until well combined and slightly aerated. The mixture should look smooth and somewhat lightened in color. Add the cooled chocolate mixture and stir until fully incorporated, creating a glossy batter.
- Combine Wet and Dry Ingredients:
- Fold the dry ingredients into the wet ingredients gradually, using a gentle hand. Stop mixing as soon as no dry streaks remain. Overmixing will develop gluten and result in tough cookies. The dough will be thick and somewhat sticky at this point.
- Chill the Dough:
- Cover the dough and refrigerate for at least 30 minutes. This crucial step firms up the dough making it easier to handle and helps develop flavor. Cold dough also spreads less during baking, ensuring your cookies maintain their shape.
- Form the Lava Cookies:
- Divide the chilled dough into 12 equal portions. Flatten each portion into a disc, place a chocolate chunk in the center, then carefully fold and seal the dough around it. Ensure no chocolate is visible and the seal is complete to prevent leakage during baking.
- Bake to Perfection:
- Arrange the cookie balls on parchment lined baking sheets with ample space between each. Bake at 350°F for exactly 10 to 12 minutes until the edges are set but centers remain soft. Look for crackly tops as your visual cue for doneness.
- Serve Warm:
- Allow the cookies to cool on the baking sheet for 5 minutes to set up slightly, then transfer to a wire rack. Serve while still warm to experience the full molten center effect. The contrast between the crisp exterior and flowing center is the signature feature of these cookies.
 Save
Save
The chocolate chunks are truly the stars of this recipe. I discovered by accident that slightly larger chunks create better lava pools than chocolate chips. My daughter once said these cookies make her feel like a scientist breaking through the earth's crust to discover molten magma, which is precisely the experience I was aiming for.
The Perfect Chocolate Selection
For these lava cookies, chocolate quality makes a tremendous difference in the final result. I recommend using bars of baking chocolate rather than chips for the melted portion, as chips contain stabilizers that affect melting. For the centers, choose a chocolate with at least 60% cacao for the richest flavor without being bitter. Premium brands like Ghirardelli or Guittard offer excellent melt properties, but even good quality store brands work beautifully. The chocolate chunks should be approximately ½-inch squares to create the perfect amount of molten center.
Make-Ahead Options
These cookies work wonderfully as a prepare-ahead dessert. The dough can be mixed and formed into balls, then refrigerated for up to 24 hours before baking. For longer storage, freeze the formed cookie balls on a baking sheet until solid, then transfer to a freezer container. When ready to bake, simply add 2 minutes to the baking time, no need to thaw first. The cookie dough balls keep in the freezer for up to three months, allowing you to bake just a few at a time whenever a chocolate craving strikes.
Serving Suggestions
While these cookies shine on their own, they become an extraordinary dessert when served with accompaniments. Try placing a warm cookie in a shallow bowl and topping with a small scoop of vanilla ice cream. The temperature contrast between the hot molten center and cold ice cream creates a delightful sensory experience. For special occasions, drizzle with warm caramel sauce or raspberry coulis for color contrast and flavor complexity. During holiday seasons, I add a sprinkle of crushed candy canes or a light dusting of edible gold dust for a festive touch.
Recipe FAQs
- → Can I make the dough ahead of time?
Yes, you can prepare the dough balls and refrigerate them for up to 24 hours before baking. This actually helps develop the flavors and ensures the cookies maintain their shape during baking.
- → How do I know when the cookies are properly baked?
The cookies are done when the edges are set but the centers still appear slightly soft. Look for a crackly top surface. Remember that slight underbaking is key to maintaining the molten center.
- → What if my cookies harden after cooling?
If your cookies cool completely and lose their molten centers, simply microwave them for 10-15 seconds to restore the gooey chocolate center before serving.
- → What type of chocolate works best for the centers?
Semi-sweet chocolate chunks work best, but you can experiment with dark chocolate or even filled chocolates like caramel or peanut butter cups for different flavor variations.
- → Can I freeze these cookies?
Yes, you can freeze the unbaked dough balls for up to 3 months. When ready to bake, you may need to add 1-2 minutes to the baking time. You can also freeze baked cookies, but the molten center effect will be diminished when reheated.
- → Are there any dairy-free alternatives for this recipe?
You can substitute the butter with plant-based butter and use dairy-free chocolate chips to make these cookies dairy-free. The texture may vary slightly but will still deliver that gooey center.